mirror of
https://github.com/dani-garcia/vaultwarden.git
synced 2026-04-26 01:35:54 +03:00
[GH-ISSUE #1255] Container on QNAP and SSL #883
Labels
No labels
SSO
Third party
better for forum
bug
bug
documentation
duplicate
enhancement
future Vault
future Vault
future Vault
good first issue
help wanted
low priority
notes
pull-request
question
troubleshooting
wontfix
No milestone
No project
No assignees
1 participant
Notifications
Due date
No due date set.
Dependencies
No dependencies set.
Reference
starred/vaultwarden#883
Loading…
Add table
Add a link
Reference in a new issue
No description provided.
Delete branch "%!s()"
Deleting a branch is permanent. Although the deleted branch may continue to exist for a short time before it actually gets removed, it CANNOT be undone in most cases. Continue?
Originally created by @pagogc on GitHub (Dec 5, 2020).
Original GitHub issue: https://github.com/dani-garcia/vaultwarden/issues/1255
I am trying to get bitwardenrs running on QNAP ContainerStation for local use only.
Just by creating the Docker-Container (your official docker Container from Hub) and setting:
i am getting the Container to run and can connect via HTTP://ipadress.
But from the web GUI, i cant progress, as all Account Creation from Browser is only allowed with secure Connection.
HTTPS connections to ip adress cant connect to the web gui.
IOS App from Bitwarden, connecting to http://[myIpAdress] seems to work, as i get into the Vault to create new Entrys.
=========================
So i tried to set up a SSL Certificate on my own, following your WIKI.
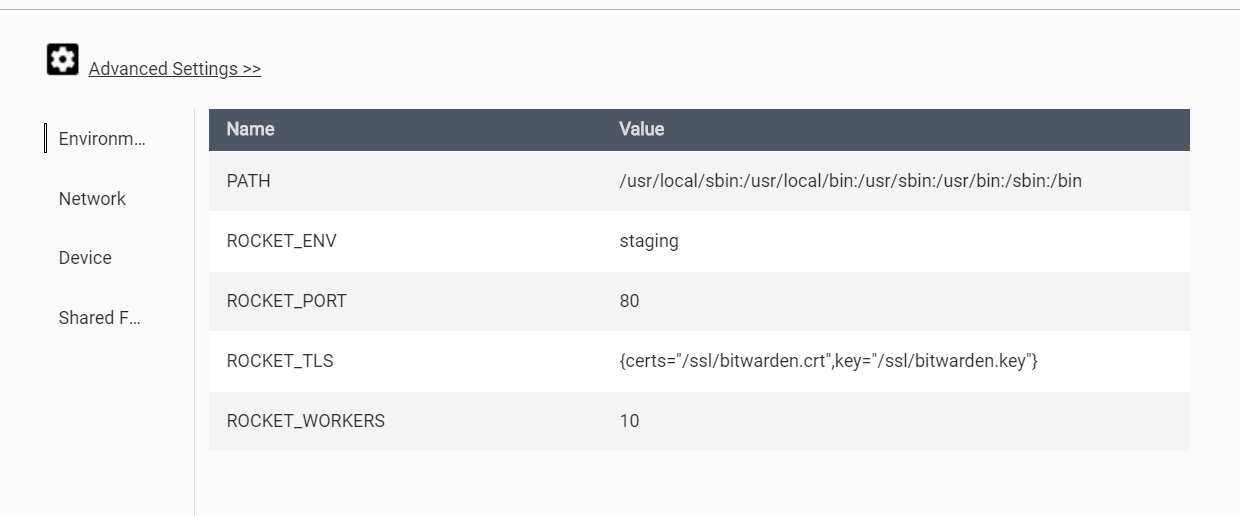
SSH'ed into QNAP, created all certs. via openssl following the WIKI, recreated the Container with ROCKET_TLS set.
Volume added to map host location to /ssl after reading Issue #465.
But as soon as i start, i cant connect to the webgui with domainname provided in cert.
HTTP://mydomainname.local in my browser (vivaldi) is responding with: ERR_EMPTY_RESPONSE
HTTPS://mydomainname.local is responding with: ERR_CONNECTION_REFUSED
To be sure that domainname gets resolved with the local ip adress, i've added a local dns record to my pi-hole container.
To be extra sure, i flushed all dns entries on windows, and pinged the domainname, getting the right ip adress and answers.
IOS App: Account Creation: Tasked failed.
Who can help me?
PS: Console output from bitwardenrs remains the same, with or without ROCKET_TLS... no errors, just info:
[2020-12-05 11:11:29.480][bitwarden_rs][INFO] JWT keys don't exist, checking if OpenSSL is available... OpenSSL 1.1.1d 10 Sep 2019 [2020-12-05 11:11:29.485][bitwarden_rs][INFO] OpenSSL detected, creating keys... Generating RSA private key, 2048 bit long modulus (2 primes)Also addet certs to brower/windows

e: Added screenshots of configuration:
@pagogc commented on GitHub (Dec 5, 2020):
Round 2:
As i tried to verify the certs with openssl (from your WIKI here), but could'nt connect to port 443, i tried port 80 with an HTTPS Request:
https://mydomain.local:80#/
This was successful, but cert seems to be invalid (but can progress through browser).
IOS App cant connect.
Used openssl 1.0.2s (28 may 2019) that was installed on QNAP (as i couldn't get it to run under windows (ssl noob here)).
Followed step by step guide from your Wiki here
@BlackDex commented on GitHub (Dec 9, 2020):
Configure the ROCKET_PORT to be 443.
Also, make sure that bitwarden.crt contains the whole chain of certs not just 1 single cert for the domain it self.
I don't know where you got the cert from, but most providers give an full chain cert or separate chain certs which you need to merge all into one.
@pagogc commented on GitHub (Dec 13, 2020):
i am using self-signed and using "mkcert" as the readme page suggests.
mkcert -installmkcert mydomain.localcat mydomain.local.pem > mydomain.local-fullchain.pemcat "$(mkcert -CAROOT)"/rootCA.pem" >> mydomain.local-fullchain.pemAfter changing it to Port 443, i am getting ERR_SSL_PROTOCOL_ERROR from browser :(.
It must be the Cert or Chain, but i just dont get it :(
@pagogc commented on GitHub (Dec 13, 2020):
Made it work, finally.
Solution for me ( local Network / HTTPS (with Warnings) ):
Prerequisites
Step 1 - Creating Container

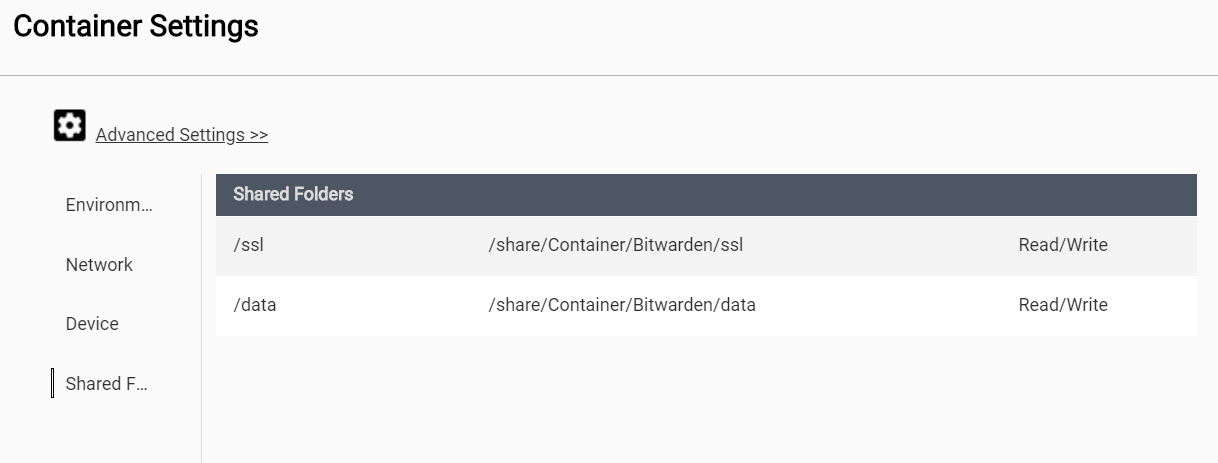
Binding both data und ssl to a location on your NAS is important, so make a new folder on your share beforehand (Filestation)
Network as you see fit:
i tested:
A) NAT:
then portforwarding in docker from example 1443 to 443 and 1080 to 80.
After initial setup you write "https://[Ipofyournas]:1443", for example in my case: https://192.168.2.200:1443
B) Bridge / Use DHCP:
Afterwards registered MAC Adress of container to my router to get fixed IP
After initial setup you write "https://[yourIP]", for example in my case: https://192.168.2.204
Step 2 - Generating CA/Cert
As generating a CA and installing it correctly didn't work for me (tried openssl on windows, mkcert on windows, copying files to NAS etc.) i followed advice from #958 to create a dummy cert directly in the container:
To quote the steps from https://lucians.dev/solve-bitwardenrs-this-subtle-is-null-error:
As i am in a QNAP NAS, i did the following of these steps:
Afterwars stop the containter and restart it again.
Now you can connect to your bitwarden vault using https (getting warning on browsers, but still can continue afterwards)
PS: Extra:
As i have an pihole container running and running bitwarden in bridge mode, i set a local dns record for my domain to the ip adress of bitwarden, so i can connect via "https://mydomain.local" for example (to clarify, why i set the env variable DOMAIN_NAME)
@pagogc commented on GitHub (Dec 13, 2020):
For completeness, when you go route B (own IP Adress for Docker container) described above:
If you want a proper certificate, so all devices on local network can interact per HTTPS/SSL with this solution:
i followed this guide/script, created it under "/ssl" in docker container/NAS, executed it in docker containter in "/ssl" folder via ssh as before:
https://community.bitwarden.com/t/ssl-certificate-for-lan-only-access-ios-13/13616/8
Adaption to script before executing:
After the lines starting with: "DNS.2 = ..." create a new line with the following:
IP.1 = IpAdressOfBitwardenExample
IP.1 = 192.168.2.204afterwards copying following files from -> to (if the Containter Settings are as in the Screenshots above):
1.) /ssl/domain/[YOURDOMAIN].crt -> /ssl/cert.pem
2.) /ssl/domain/[YOURDOMAIN].key -> /ssl/key.pem
restarting docker container (for example via containter station).
Now all devices need the root-certificate:
Go to your NAS WebGui -> Filestation to the folder, where bitwarden ssl folder is located.
There lies a ca folder, inside download rootCA.crt
Windows-KEY or bottom left and search "certificate" and click "install computercertificate" (or something similar).
rightclick on tree "trusted root certificates" -> import and choose downloaded rootCA.crt.
Now you are set up for almost all browsers and Chrome plugin.
either with domainname (if you have a DNS Resolver or something in your network, like pi-hole, for resolving your domainname with local ip) or with ip-adress.
Follow this instruction, chapter "Adding the Root Certificate to iOS":
https://deliciousbrains.com/ssl-certificate-authority-for-local-https-development/
PS:
i have not cleared the last stage that my phone resolves local DNS records.
Therefore adding the IP adress in the certificate above.