mirror of
https://github.com/NginxProxyManager/nginx-proxy-manager.git
synced 2026-04-25 17:35:52 +03:00
[GH-ISSUE #1571] Pleroma proxy setup #1187
Labels
No labels
awaiting feedback
bug
cannot reproduce
dns provider request
duplicate
enhancement
enhancement
enhancement
good first issue
help wanted
invalid
need more info
no certbot plugin available
product-support
pull-request
question
stale
troll
upstream issue
v2
v2
v2
v3
wontfix
No milestone
No project
No assignees
1 participant
Notifications
Due date
No due date set.
Dependencies
No dependencies set.
Reference
starred/nginx-proxy-manager-NginxProxyManager#1187
Loading…
Add table
Add a link
Reference in a new issue
No description provided.
Delete branch "%!s()"
Deleting a branch is permanent. Although the deleted branch may continue to exist for a short time before it actually gets removed, it CANNOT be undone in most cases. Continue?
Originally created by @ErikUden on GitHub (Nov 6, 2021).
Original GitHub issue: https://github.com/NginxProxyManager/nginx-proxy-manager/issues/1571
Are you in the right place?
I have tried asking on Reddit: https://www.reddit.com/r/nginxproxymanager/comments/qlaam6/
However, I have received no answer as of yet. I replaced the
Checklist
jc21/nginx-proxy-manager:latestdocker image?Describe the bug
Hello there!
I have recently installed Pleroma on my Raspberry Pi and have now used a different Raspberry Pi to reverse proxy it using the Reverse Proxy Manager. However, the actual setup requires a much more complex and different setup than what the Nginx Reverse Proxy Manager can deliver via the user interface. I began using the reverse proxy manager because back then I didn't understand anything about hosting and nginx, nowadays, I understand quite a bit, at least enough to be able to ssh into the server and edit a config file myself. Is there any way to do that with the Nginx Reverse Proxy Manager?
This is my complex Nginx setup that I need:
I like the fact that Nginx takes care of my SSL certificates. I like the fact that it "blocks common exploits" or "caches assets" however, I would really like for my service to work and this is the setup it will need for that.
This is how the file (in
nginx/data/nginx/proxy\_host/28.conf) looks like:This is what I added myself through the interface.
It made some of the important features work, but sadly not the most important.
Obviously I could replace the SSL section with the one provided by the Nginx reverse proxy manager, right?
Please help me! You are my only hope. Any comment, question or help is appreciated!
Nginx Proxy Manager Version
v2.8.1
To Reproduce
Steps to reproduce the behavior:
Expected behavior
It should work and reverse proxy my Pleroma instance
Operating System
I am on arm64 on my Raspberry Pi 4b 4GB.
Additional context
I just need the exact configuration specified here: https://docs-develop.pleroma.social/backend/installation/otp_en/#edit-the-nginx-config to work on my system. However, Pleroma isn't hosted on the same Raspberry Pi as is the Nginx Reverse Proxy Manager, so it needs some editions (localhost needs to be changed to an IP address, etc.)
@chaptergy commented on GitHub (Nov 6, 2021):
What "most important feature" haven't you got working? SSL should work out of the box when you have created the proxy host and associated a certificate with it.
You can add these headers via the advanced config:
This snippet
would have to be written in a file on your host and mounted into the docker container at
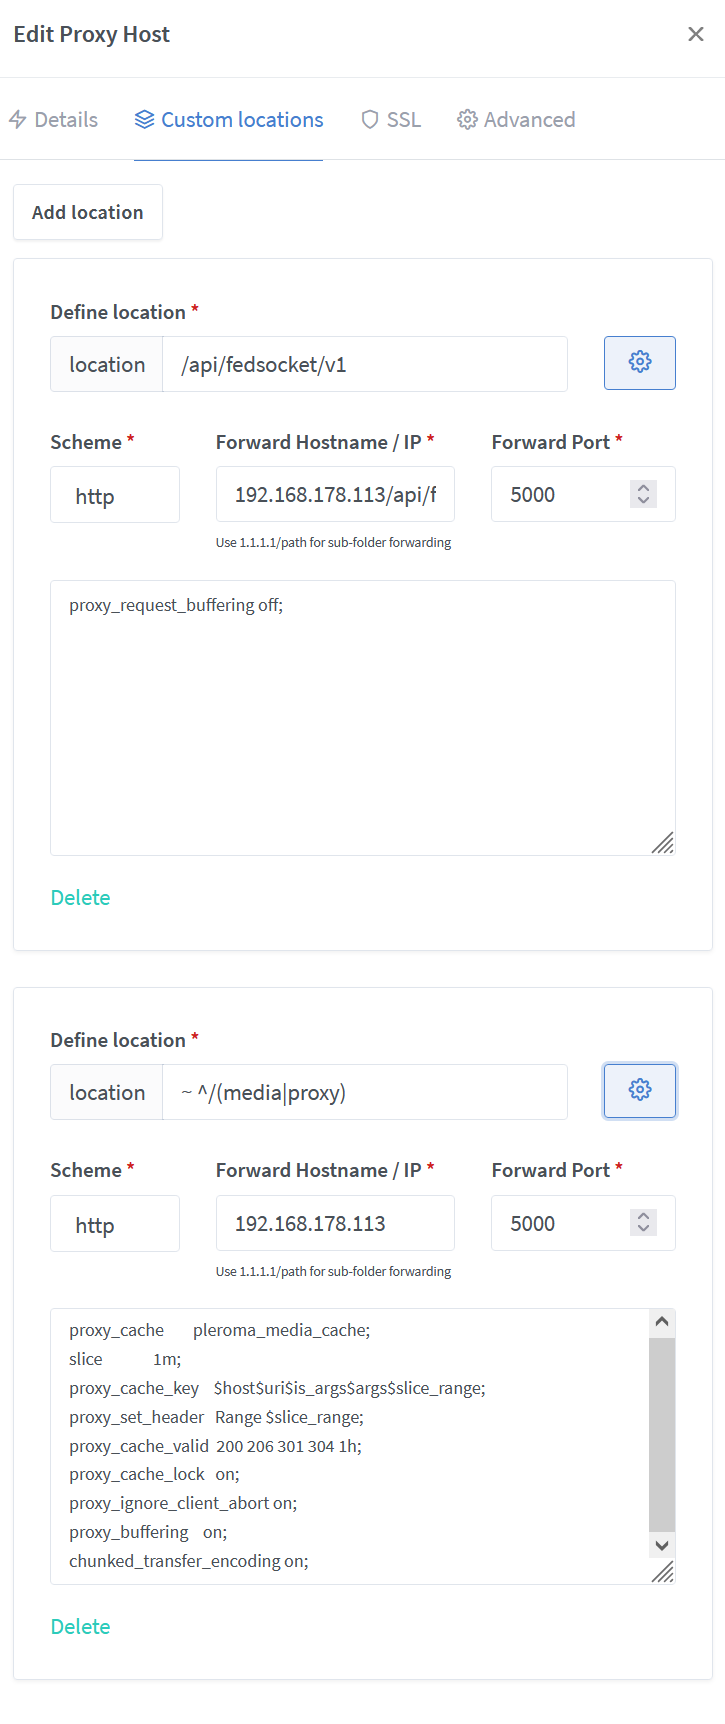
/data/nginx/custom/http_top.conf.Then you can also add a custom location
~ ^/(media|proxy)with target192.168.178.113:5000and advanced config@ErikUden commented on GitHub (Nov 7, 2021):
Thank you very much for your help and your easy to follow answer!
So, I've SSH'd into the docker container using
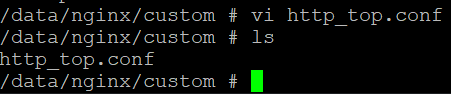
sudo docker exec -it --user root containerID shI've created the file and directory ("custom" didn't exist)
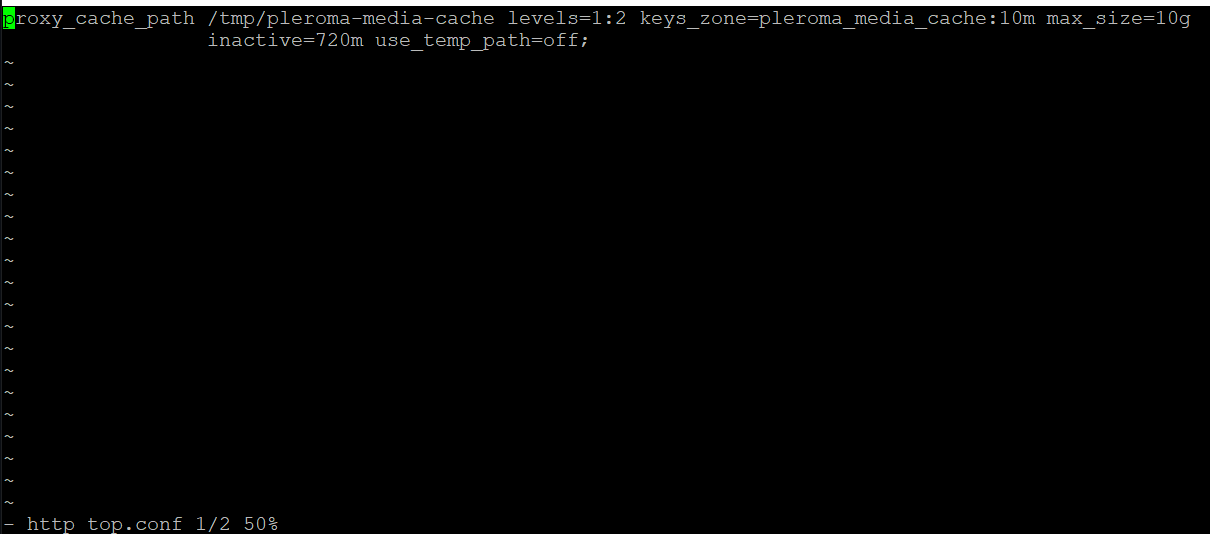
This is how the file "http_top.conf" looks like:
I have successfully added
So, everything you suggested worked! I think. I even restarted nginx using systemctl.
Whenever I entered any of this code:
Into my advanced config, it seemed to go offline, so I think the nginx reverse proxy manager already takes care of SSL.
The only thing that I have not done is add a custom location called "~ ^/(media|proxy)". Should I just write it into the same http_top.conf file with
192.168.178.113:5000?@chaptergy commented on GitHub (Nov 7, 2021):
You have created the file inside the container, which is fine for now, but be warned that it will probably no longer be there when you update. What I meant is mounting it into the container via your docker-compose. That way the file stays on your host and gets mounted into every version of the container there will be.
Not sure why the ssl config crashes your host, it does not do it for me. When you hover over the Offline status, you can see the error message. NPM takes care of generating the ssl certificate, but these configs are additional options for the tls connection between the host and the proxy. Some of them are already set and I just guessed which ones you should add, but it turns out only these three ssl settings are not yet set:
However they are most likely not required for the service to work correctly, so you could also just not add them.
I also assumed you added the custom location via the custom locations tab, but you have added it via the advanced config? You can add them in the custom locations tab:
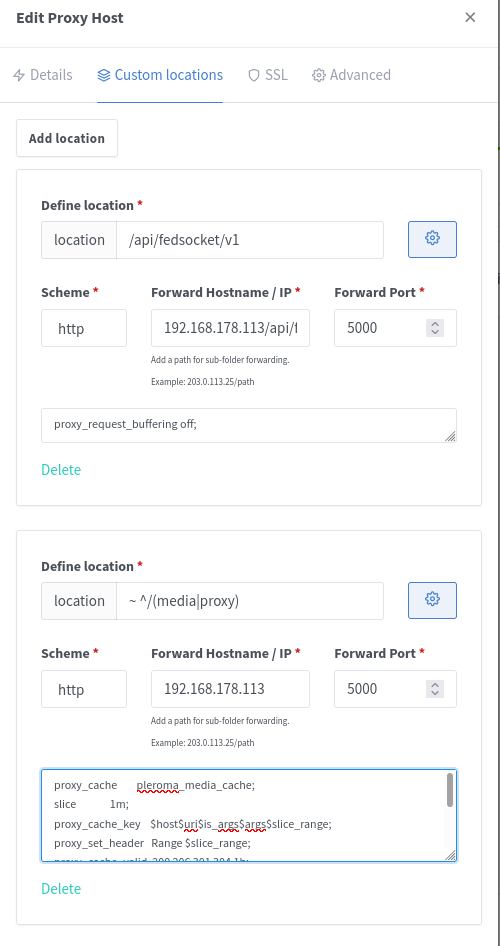
But this is most likely also optional as this only changes the caching behavior of media files. If you do not add this custom location, you also do not need the
http_top.conffile.@ErikUden commented on GitHub (Nov 7, 2021):
Okay, thank you very much! I did exactly as you described and all works, including the media proxy.
I have also added the http_top.conf file to my nginx reverse proxy manager docker-compose.yml file so that when I rebuild it this file and change will not be lost!
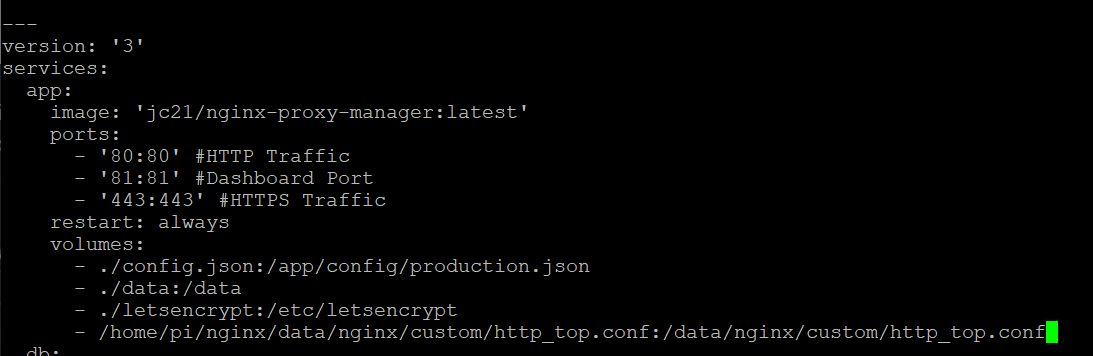
(although I am quite uncertain whether this works or makes a difference as the entire "data" directory is mounted)
So, after everything worked I added the three not-already-set variables:
And it is still online.
You can visit https://social.uden.ai/ and it seems to all work. Now I just need to verify whether the federation feature all works or not. It should as essentially everything has been added except for:
as well as:
The
upstream phoenix(or any other name) cannot be simply set in the advanced settings for obvious reasons (or can I add it to the http_top.conf?) and if I add the second string of code it wouldn't work without the first one (obviously) and if I were to replace "phoenix" with my local IP, it would simply stop enforcing https, so, yeah.However, main things should be fixed. All of the nginx config suggested by the Pleroma-OTP install here:
https://docs-develop.pleroma.social/backend/installation/otp_en/#edit-the-nginx-config
Are added. So, I will test and see whether I am online to the federation.
Thank you so much for your help!!
@ErikUden commented on GitHub (Nov 7, 2021):
Okay, wonderful. I have just been followed by someone from another Pleroma instance! The federation is online. I am very grateful for your immense help @chaptergy Thank you very much! Nginx is not my strongest suite, but thanks to you that did not stop me from putting a Pleroma instance online. Very, very nice.
@chaptergy commented on GitHub (Nov 7, 2021):
Great to hear everything works! You don't actually need the
upstream phoenixpart. If you have set the host configuration on the main config page to use192.168.178.113and port500the location/is automatically generated for you. No need for the upstream section. I'm not sure why you'd think it would stop enforcing https, if you enable HSTS you should be absolutely fine.@jachin commented on GitHub (Nov 11, 2022):
Thank you all for this discussion it was very helpful. 1 additional note on something that took me a while to figure out. I had to change the configuration on Pleroma so it would allow an IP address other than
127.0.0.1to connect to it.https://docs.pleroma.social/backend/configuration/cheatsheet/#pleromawebendpoint
I had to change the
ipand then restart Pleroma.@ErikUden commented on GitHub (Nov 12, 2022):
Wait, could you post a copy of your configuration?
@jachin commented on GitHub (Nov 12, 2022):
Well... there are secrets in the config file, so I'm not going to share it all. But this is part of my
prod.secret.exsThis is the part in
config :pleroma, Pleroma.Web.Endpoint,... I think I don't really know how to read these.exsconfig files.I think this setting means it will allow any IP address can connect to my Pleroma server, in theory I could restrict this to just my Nginx Proxy Manger.